I’ve found that few manufacturers pre-treat parts, so many enthusiasts take matters into their own hands. I began this hobby because my keyboard sounded thin. After some trial, I learned that careful lubrication transforms the sound into a deep, satisfying thock.
The process takes time, but it rewards patience. Each key gains a smoother travel and fewer scratchy moments. Whether you use linear, tactile, or clicky types, a careful touch brings consistency across every press.
What I learned after lubing my first switches the wrong way
When I first got into lubing switches, I expected a quick improvement just by applying product and reassembling everything. In reality, my first attempt didn’t go well—I used too much lubricant, and the keys ended up feeling sluggish instead of smooth. It was only after going back, cleaning a few switches, and applying a much lighter layer that I started to notice the difference. That experience taught me that precision matters much more than quantity in this process.
From my experience, the biggest improvement comes when you slow down and treat each switch consistently. Rushing through the process often leads to uneven results, where some keys feel great and others feel off. I’ve learned to work in small batches and test along the way, which helps catch mistakes early and keeps the typing feel uniform across the board.
I’ve noticed that the best results come from patience—once you find the right amount of lube, everything starts to feel noticeably more refined.
If there’s one practical tip I’d give, it’s to start with a minimal amount and build from there instead of trying to fix over-application later. It’s much easier to add a bit more lube than to clean and redo a switch, and this approach saves both time and frustration in the long run.
Beyond better sound, the task feels oddly meditative. I enjoy the ritual of opening a board, tuning each contact, and testing progress. The result is a more pleasant typing session and a keyboard that lasts longer.
Key Takeaways
- Most makers don’t pre-lube, so many users apply lubricant themselves.
- Taking the time yields a richer acoustic profile and smoother action.
- Both feel and sound improve across different switch types.
- The method is rewarding and can be a calm, focused hobby.
- Proper care extends the lifespan and enjoyment of your keyboard.
Understanding the Benefits of Switch Lubing
Proper treatment of keyboard internals delivers clear gains in both sound and feel. I find that a well-treated switch reduces scratch and creates a deeper, more premium thock.
Krytox 205g0 is my go-to for most linear switches. Its steady viscosity preserves smooth travel without slowing the action.
“Using the wrong product can make keys feel sluggish; choose lubricant based on the switch type.”
Tactile switches often need lighter compounds like Tribosys 3203 or Carbon GS1. That preserves the bump while cutting friction.
- I always remind beginners that you do not strictly need lube for keyboard parts, but it greatly improves the typing experience.
- Lubing minimizes friction between stem and housing and removes scratchiness and pinging sounds.
- Clicky types work best with low-viscosity options such as Krytox 105 so the click remains audible.
Patience matters: it takes time to get used to the refined sound and feel. Once you notice the change, it becomes hard to go back.
Essential Tools for How to Lube Mechanical Switches
Getting the proper tools first saves time and protects delicate parts. I always kit up before I touch any keyboard. A tidy setup reduces mistakes and keeps parts clean.
Choosing the Right Lubricant
Pick a compound that matches your switch plastic. For most linear types I reach for krytox 205g0 for consistent feel. For tactile types I use lighter switch lube so the bump stays crisp.
Necessary Modding Equipment
- I recommend a dedicated switch opener; it speeds the job and protects fragile tabs.
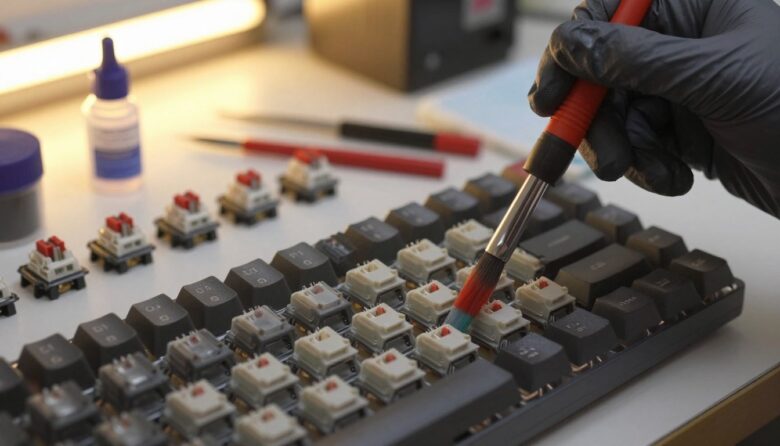
- Use a quality lube brush, like a size 00, for precise application and minimal excess.
- A lube station keeps housings, springs, and stems organized so nothing vanishes.
- Complete kits such as the ROG Azoth and the Glorious Lube Kit bundle a switch puller and tools that really help.
- Keep a clean workspace and avoid contaminating your lubricant with dust.
Preparing Your Workspace and Switches
Before any part comes off, I clear a large, well-lit area so nothing gets lost. I unplug the keyboard and flip the power switch off. That simple step protects the PCB and my tools.
I remove keycaps first with a puller and keep them in order. Laying caps in rows makes reassembly quick. Next, I use a switch puller to lift each unit gently. This is the safest way to avoid bent pins or damaged hot-swap sockets.
Cover your desk with a clean mat so grease and dust do not spread. I avoid petroleum-based products; those can harm plastic housings and shorten the life of keyboard switches.
Removing every piece from a full-sized board takes time and patience. I sort stems, springs, and housings into labeled trays. That level of order makes lubing switches much faster and far less stressful.

Disassembling Your Mechanical Switches
Start calm and work in small batches. I always orient each switch with the top face up before I touch the opener. That simple habit makes the top housing unhinge cleanly and protects the delicate tabs.
Use a switch puller first to lift units from the keyboard. Removing them carefully prevents bent pins and keeps the contact leaf in the bottom housing where it belongs.

Using a Switch Opener Safely
I place the piece into the switch opener and confirm the alignment marks match. When tabs line up, the top pops off with very little force. That reduces stress on legs and prevents cracks in the housing.
- I use a specialized switch opener to unhinge the top housing from the bottom housing without harming tabs.
- Once open, I sort stem, spring, and housing into labeled containers for fast reassembly.
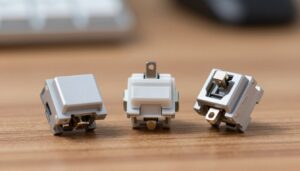
- I treat the stem as the key part; its legs must stay clean for the intended feel and sound.
- I keep the crosspoint contact inside the bottom housing — removing it can ruin a switch.
“Proper orientation and a gentle opener movement save time and preserve parts.”
Applying Lubricant to Switch Components
I begin by stabilizing the bottom housing so I can focus on rails without wobble. Using a lube station keeps the housing steady and speeds the process.
Lubing the Bottom Housing
I apply a small amount of Krytox 205g0 to the rails where the stem makes contact. I brush lightly and remove excess to avoid a mushy feel.
Treating the Stem and Rails
Coat all four sides of the stem evenly with a thin layer. I use a size 00 lube brush and run it along the stem legs and the inner rails of the top housing for smooth travel.
Managing Spring Lubrication
For springs, I prefer bagging with Krytox 105 oil. A few drops in a sealed bag and a gentle shake gives full coverage without waste.
- I avoid the metal contact leaf in the bottom housing; oil there can ruin electrical contact.
- I check for no white residue after work—this confirms the correct amount.
| Component | Product | Amount | Technique |
|---|---|---|---|
| Bottom housing | Krytox 205g0 | Small amount | Brush rails, wipe excess |
| Stem (four sides) | Krytox 205g0 | Thin coat | Brush evenly on legs and sides |
| Spring | Krytox 105 | Few drops | Bag shake, dry on paper |
Reassembling and Testing Your Keyboard
Reassembly starts with a calm rhythm: spring into the bottom, stem seated, then the top clicks in.
I work in small batches so I can spot errors quickly. I line up the legs of the stem with the contact in the bottom housing. That prevents bent pins and keeps the feel consistent.
I snap each top housing firmly but gently. If you used a small amount of switch lube, the top will close smoothly and the stem will move freely.
- I reinstall springs and housings, then place switches back into the case.
- I open a word processor and test every key for registration and sound.
- If a key feels dull or unresponsive, I suspect too much lube on the stem legs or contact.
- I clean excess with isopropyl alcohol and recheck the spring seating.
“Give yourself time; the new feel and sound settle after some typing.”
If linear or tactile types seem off, test each type individually. A quick check at the lube station saves long rework later and preserves the typing experience I prefer.
Conclusion
Small, steady changes often yield the biggest gains in sound and feel.
I hope this guide showed that you do not strictly need lube for your keyboard, yet a careful touch can make a real difference. A single, measured session improves the sound and the overall feel.
Taking the time pays off. Lubing a few parts refines the typing experience and rewards patience. I found the process both useful and satisfying.
Less is more when you work on switch parts. Use the right product, test each type, and tune keyboard switches until the sound matches your taste.
Enjoy the process: a small investment of time gives better sound, consistent feel, and a keyboard you like using every day.
FAQ
What benefit will I notice after I lube my keyboard switches?
I get a smoother keypress, reduced scratchy noise, and a deeper, more solid thock. Proper lubrication cuts friction between the stem and housing, tames spring resonance, and makes typing feel more consistent without changing actuation force much.
Which lubricant should I pick for best results?
I prefer Krytox 205g0 for linear switches and heavier Krytox blends for those who want a denser sound. For tactile switches I use a thinner option like Tribosys 3204 on the legs only. Always check compatibility with your plastic and start with a small amount.
What tools are essential before I start modding?
I always have a switch opener, a puller for keycaps and switches, fine brushes (00 or 000), grease and thin lube syringes, a spring bag, and a lint-free mat. A lube station or jig speeds things up and keeps parts tidy.
How do I prepare my workspace and prevent contamination?
I work on a clean, well-lit surface with a soft mat. I wash my hands, use tweezers for small parts, and keep lubes capped. Having small labeled containers for housing, stems, and springs prevents mix-ups and reduces dust contact.
Is disassembly difficult and will I break switches?
It’s straightforward if you use a switch opener. I place the switch in the opener, depress slightly, and lift the top housing. With steady hands and the right tool, I avoid cracking the plastic. Practice on a spare switch first.
How much lubricant should I apply to the bottom housing?
I use a thin, even coat—just enough to eliminate dry spots. For the bottom housing I apply a light swipe along the rails and contact points. Too much makes the feel sluggish and attracts debris, so less is usually better.
Where exactly do I put lube on the stem and rails?
I focus on the sides of the stem rails and the bearing surfaces that contact the housing. For tactile stems I avoid the tactile bump; instead I apply minimal lube on precise areas to preserve tactility while reducing scratchiness.
Should I lube springs and how do I do it?
Yes, a light coat on springs reduces ping. I place springs in a small bag, add a drop of lubricant, shake gently, and blot off excess on a paper towel. This minimizes sticky buildup while cutting high-pitched resonance.
How long does the whole process take per switch?
With experience I finish a switch in about 60–90 seconds. My first few took longer while I learned careful brush strokes and part handling. Using a switch opener and an assembly station cuts time significantly.
Do I need to lube every switch type the same way?
No. Linears tolerate heavier greases for a deep thock. Tactiles need targeted, minimal application to keep the bump. Clicky switches generally aren’t lubed because it can mute the click mechanism.
Can I lubeswitches in-plate or do I need full disassembly?
For best, consistent results I fully disassemble each switch. Light surface lubing without opening can help slightly, but it won’t reach rails or springs and won’t eliminate internal scratchiness.
How do I reassemble and test for quality?
I re-seat the stem and spring, snap the top housing back on, and test each switch on a switch tester or keyboard. I listen for even sound and check travel. If a key feels sticky, I open it again and remove excess lube.
Any tips for keeping the work efficient and tidy?
I sort parts by row, use small labeled containers, and batch-process: open many switches, lube all bottoms, then stems, then springs, and finally reassemble. That workflow saves time and keeps quality consistent.

Dylan Mercer is a hardware enthusiast specializing in mechanical keyboards and high-performance mice. He shares in-depth reviews, switch comparisons, and setup tips to help users achieve precision, speed, and comfort in every click and keystroke.