I write about gear that makes typing smoother and more personal. I tried the Freewrite Smart Typewriter with mechanical switches and the Traveler with scissor switches. The difference in feel is clear to me: mechanical options give a richer typing experience.
Many folks want to change switches but dread soldering and extra tools. A hot-swappable keyboard lets you remove and install switches on the board via sockets. That means faster customization and less time with a soldering iron.
What made hot-swappable keyboards much easier than I expected
When I first heard about hot-swappable keyboards, I assumed it would still be a complicated process with a high chance of damaging something. But after trying it myself, I realized how straightforward it actually is. Being able to remove and install switches without soldering made testing different options much more practical, and I didn’t need any advanced tools to get started. That experience showed me that customization can be simple if the setup is designed for it.
From my experience, the biggest benefit is the freedom to experiment without commitment. I’ve tested different switch types on the same keyboard and quickly noticed how each one changes the typing feel and sound. This helped me understand my own preferences instead of relying only on reviews or recommendations.
I’ve noticed that once you try swapping switches yourself, it becomes much easier to understand what actually feels right for your typing style.
If there’s one practical tip I can give, it’s to start slowly and test a few keys before changing the entire board. This lets you compare differences side by side and avoid unnecessary work if a switch doesn’t match your expectations. Over time, this approach makes customization more efficient and much more enjoyable.
I also note practical things: when you visit a guide page, you may see a page blocked extension notice. If that happens, try disabling extensions or disabling the extension that shows a blocked extension blocked error so the page loads properly.
Key Takeaways
- Mechanical keyboards offer a distinct feel compared to scissor switches.
- Hot-swap sockets let you change switches without soldering or special tools.
- Understand the circuit board and sockets before you swap parts.
- If a page is blocked, try disabling extensions to fix extension blocked errors.
- Enthusiasts choose by durability, keycaps, and switch types to match preferences.
Understanding Hot-Swappable Keyboards Explained
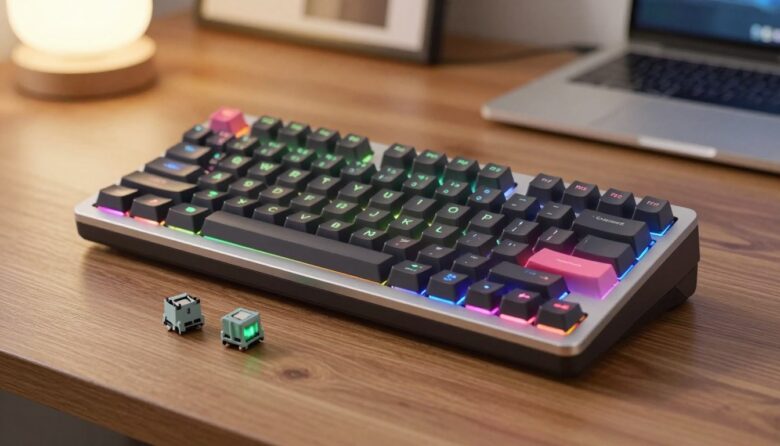
I like gear that lets me tune each key’s response without a soldering iron. A hot-swappable keyboard uses special sockets so you can pull out switches and plug in new ones in seconds.
These sockets mean you do not need tools or repairs for simple swaps. The result is a faster way to test different switch types and find the best typing feel for your hands.
Here are the main benefits I’ve seen:
- Easy customization: swap switches to change sound and actuation.
- Longer lifespan: replace worn parts without expert help.
- Trial and error: try different keys to tune your typing experience.
If you hit a page blocked extension while reading about swaps, try disabling extensions to remove the blocked extension blocked error and keep your research moving. A blocked extension can cause a page blocked issue, so disabling extensions often fixes it.
Why You Should Consider a Hot-Swappable Board
I chose a flexible board early on because it made upgrading simple and fun. A hot-swappable keyboard lets me test new parts without a soldering iron, so I learn what I like faster and with less risk.
The Gateway for Beginners
Beginners can start small. I recommend a sample pack of linear switches to try different feels before committing to a full set for a mechanical keyboard.
- I suggest testing a few switch types to find the right typing experience.
- If you hit a page blocked extension, try disabling extensions so the guide loads correctly.
- Swap keycaps and switches to learn what gives the best sound and feel.
Extending Keyboard Lifespan
One broken switch does not mean a dead board. Replacing a single faulty switch keeps a keyboard working for years and improves long-term value.
For enthusiasts, the sockets on these boards open a world of options. You get better quality and more customization, and every key stays responsive for daily typing and work.
Comparing Hot-Swap and Soldered Keyboards
When I compare a soldered build to a modular board, the trade-offs are clear. A soldered mechanical keyboard has switches permanently fixed to the circuit board. That gives a stable electrical connection and strong durability.
But soldered models limit future customization. You can’t swap a bad switch or test new options without desoldering. For someone who likes to change switches often, that feels restrictive.
I find the typing experience between a well-made soldered board and a modular one is similar for most users. The real win for modular designs is freedom: you can update keys and try new switches anytime.
- Stable connection: soldered boards excel here.
- Flexibility: modular boards offer more options and easier repairs.
- If you see a page blocked extension, try disabling extensions to fix a blocked extension and continue researching.
Essential Tools for Your Customization Journey
A small set of basic tools makes swapping switches safe and stress-free.
I always carry a high-quality switch puller to remove switches without bending pins or harming the sockets. A proper puller saves me time and keeps each keycap and switch intact.

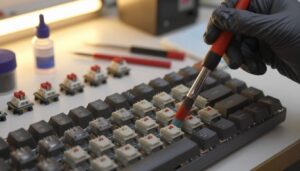
Using a Switch Puller Safely
Grip the keycap, ease the puller under the switch, and pull straight up. Work slowly to avoid twisting the switch or stressing the socket.
- Use the right tool: a good puller reduces socket wear and protects the board.
- Test gently: replace one switch at a time to check feel and sound.
- If you see a page blocked extension, try disabling extensions so you can view guides about maintenance.
| Tool | Purpose | Why I Use It |
|---|---|---|
| Switch puller | Remove switches safely | Prevents socket damage and saves time |
| Keycap puller | Lift keycaps without scratching | Keeps keycap profiles consistent |
| Small brush | Clean sockets and board | Improves durability and quality of typing experience |
Using these tools helps me maintain a great typing experience, whether I’m testing linear switches or swapping a single key. Careful work keeps the board out of the soldering bench and extends its life.
Navigating Switch Compatibility and Pin Types
When selecting switches, I always check pin layout first to avoid a frustrating mismatch.
Understanding pin types helps with safe customization and keeps the circuit and sockets intact. Akko models I’ve used support both 3-pin and 5-pin mechanical switches, which makes mixing parts easier.
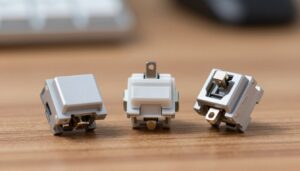
Understanding Three-Pin Switches
Three-pin switches have two electrical pins and one plastic stabilizer peg. They fit most standard PCB sockets and work well when you want to swap switches quickly.
These are lighter to install and usually compatible with many keycap sets. Check the board’s socket layout before buying to avoid bent pins.
Understanding Five-Pin Switches
Five-pin switches add two extra metal legs for sturdier mounting to the PCB. They reduce wobble and feel more secure, especially with heavier keycaps.
Most modern boards accept both 3-pin and 5-pin types, but confirm support in specs. If you hit a page blocked extension while researching, a blocked extension may stop you from seeing this page about pin types—so disable extensions if needed.
- Pro tip: Inspect the switch pins and PCB before installation to protect your board and ensure smooth typing.
Troubleshooting and Maintaining Your Mechanical Keyboard
A dead key needn’t mean a new purchase—most faults are quick to diagnose and fix. I first test the key in software, then remove the cap to inspect the switch and stabilizer.

If a single switch fails, I recommend swapping that switch to restore function. Replacing one part saves time and money, and keeps the board working without soldering.
Routine care helps retain typing feel. Clean around the stems, check keycap fit, and test keys after each change. These small steps protect durability and preserve the typing experience.
- Quick checklist: run a key test, swap the faulty switch, reseat the keycap, and retest.
- If you hit a page blocked extension, resolve the blocked extension so you can access repair guides on the page.
- Choosing to repair a key is a cost-effective choice that extends the life and quality of your keyboard.
Whether you game or write, a well-maintained hot-swappable keyboard keeps keys responsive and the overall experience consistent. I find this approach makes customization and long-term care simple and satisfying.
Personalizing Your Typing Experience with Keycaps
Swapping keycaps is the fastest way I refresh both the feel and look of my setup. A new set makes the keyboard feel like a different tool and gives my desk a fresh personality.
I focus on profile first. Different keycap profiles change finger reach, sound, and comfort. Trying profiles helps me find what suits long typing sessions.
Matching Keycap Profiles to Your Style
Profile choice impacts typing precision. I prefer sculpted sets when I want fast, confident typing. Flat profiles work well for a minimalist look and steady rhythm.
The switches I pair with caps matter too. Most mechanical switch stems accept standard keycaps if the stem matches the cross-shaped mount. That keeps customization simple.
- I love choosing caps that match my aesthetic and improve the typing experience.
- If a page blocked extension stops your research, a blocked extension might hide useful guides about profiles and sets.
- A page blocked warning means you should fix the extension so you can learn more about keycap fit and options.
Changing keycaps is the easiest, lowest-cost upgrade. It refreshes each key and makes the keyboard truly mine.
Conclusion
, My tests show that trying different switch types often changes your typing experience more than you expect. The flexibility to swap a switch without soldering keeps options open and lowers upkeep.
I hope this guide helps you pick a mechanical keyboard and explore keycaps and switches with confidence. If you saw a page blocked extension or a blocked extension blocked notice, try disabling extensions on the page to continue your research.
Whether you’re new or deep into customization, the freedom to change parts protects durability and improves long-term quality. Thanks for reading, and enjoy shaping the feel and sound of your keys.
FAQ
What makes a hot-swappable board different from a soldered one?
A hot-swap board uses sockets on the PCB so I can remove and replace mechanical switches without soldering. That lets me test different switch types—linear, tactile, or clicky—quickly and with minimal tools. Soldered boards require me to desolder and resolder switches, which takes more time and skill.
Can I change any switch I want on a hot-swap board?
Mostly yes, but I need to check compatibility. Many PCBs accept three-pin and five-pin switches, while some only fit three-pin. If a switch has five pins and the socket is three-pin-only, I can usually remove the two extra pins. Always verify the board’s pin type and the switch’s specification first.
Do I need soldering skills to start customizing my keyboard?
Not with a hot-swap board. I can swap switches and change keycaps without soldering, which makes this a beginner-friendly entry into mechanical customization. If I later want to change the PCB or install LEDs, soldering skills could become useful.
What tools should I have for swapping switches safely?
I keep a switch puller, a keycap puller, and a small set of tweezers handy. A soft mat protects the board while I work. For more advanced mods, I might add lubricants, switch openers, and foam for sound dampening. These tools keep the process clean and reduce the risk of damaging switches or the PCB.
How do three-pin and five-pin switches differ in practice?
Three-pin switches are lighter to install and compatible with most sockets. Five-pin switches include two extra plastic legs for added stability when mounted to a plate. If my board has five-pin support, I get the best stability without clipping pins. If not, I can clip the extra pins on a five-pin switch to fit three-pin sockets.
Will swapping switches impact typing feel and sound a lot?
Absolutely. The switch type controls actuation force, travel, and feedback. Linear switches give a smooth press, tactile switches add a bump, and clicky switches provide an audible click. Keycaps, switch lube, plate material, and foam also change acoustics, so the overall experience comes from several elements working together.
How does a hot-swap board help extend a keyboard’s lifespan?
When a switch wears out or I want an upgrade, I can replace only the affected switches instead of the whole board. That reduces waste and saves money. I can also experiment with new switch designs as they come out, keeping a single board relevant for years.
Are there any drawbacks to using a hot-swap socketed PCB?
Sockets add a small cost and can slightly change the board’s feel compared to a fully soldered setup, especially for heavy typists. Rarely, a socket can fail, but replacements are available. For most users, the convenience outweighs these minor trade-offs.
How do I choose keycap profiles to match my typing style?
I look at profile shape, row sculpting, and material. Sculpted profiles like SA and DSA affect finger travel and hand positioning differently than OEM or Cherry profiles. ABS is smoother and can shine over time; PBT is more textured and durable. I pick what feels comfortable and matches my aesthetic.
What maintenance keeps my mechanical setup performing well?
I clean keycaps periodically, remove dust from the PCB area, and re-lube switches when I notice scratchiness. Tightening stabilizers and using foam between plate and PCB improves sound and feel. For deeper issues, I check socket contacts and swap suspect switches to isolate problems.
Can I mix different switch types on one board?
Yes, I often mix switches—using tactile ones on modifiers and linear ones for alphas—to tailor the typing feel. Hot-swap sockets make this safe and reversible. Just ensure physical compatibility and consistent keycap profiles for the best experience.
Is it worth buying a hot-swap board if I plan to solder someday?
Definitely. A socketed board gives me flexibility now, and some PCBs and cases are compatible with both hot-swap sockets and soldered builds. It’s a low-risk way to explore mods before committing to soldering and permanent changes.
Where should I look for reliable switches and parts?
I buy from established vendors and brands like Cherry, Gateron, Kailh, and NovelKeys for switches, and GMK or Drop for premium keycaps. Reviews, community threads on Reddit and r/MechanicalKeyboards, and YouTube tear-downs help me judge quality and durability before I buy.

Dylan Mercer is a hardware enthusiast specializing in mechanical keyboards and high-performance mice. He shares in-depth reviews, switch comparisons, and setup tips to help users achieve precision, speed, and comfort in every click and keystroke.